When I first dipped my toes into the world of digital marketing, I was bewildered by Google Search Console. One day, an old friend of mine asked me about getting his charity website, focused on asbestos awareness, to rank better. It turned out, the secret was as simple as adding a sitemap. Through a few lightbulb moments, I learned how crucial this step is and now, I'm excited to share my journey and tips on how to do it yourself!
TL;DR: Learn how to add a sitemap to Google Search Console to improve your website's searchability and make it easier for Google to crawl your site.
Table of Contents
Why A Sitemap Matters: The Basics Of Discovery
Have you ever thought about how search engines like Google find your website? It’s not magic; it’s all about organization. This is where a sitemap comes in. I truly believe that sitemaps are critical for guiding search engines straight to your content.
The Importance Of Sitemaps
Sitemaps are essential tools. They serve as a guide for search engines to understand the layout of your website. Here’s a simple way to look at it: imagine you’re exploring a new city. Would you prefer to wander aimlessly, or would you rather have a map? Of course, a map helps!
- Sitemaps provide a clear path for search engines, allowing them to find and index all the important pages on your site.
- They lay out a roadmap for Google. This roadmap enables efficient crawling and indexing.
- Especially for new websites, having a sitemap can significantly increase your site’s visibility.
How Sitemaps Help With Discovery
When I was setting up my website, I quickly realized that creating a sitemap was a no-brainer. Here's why:
- Guiding Search Engines: A sitemap tells search engines where they can look for content. Just like a city map shows the best routes, sitemaps do the same for your website.
- Boosting Visibility: For new websites, it can be hard to get noticed. A sitemap helps level the playing field. It grabs the attention of search engines, resulting in faster indexing.
- Efficiency: Without a sitemap, search engines might miss some of your valuable content. You wouldn’t want them to skip over a hidden gem on your site, would you?
Getting Started With Sitemaps
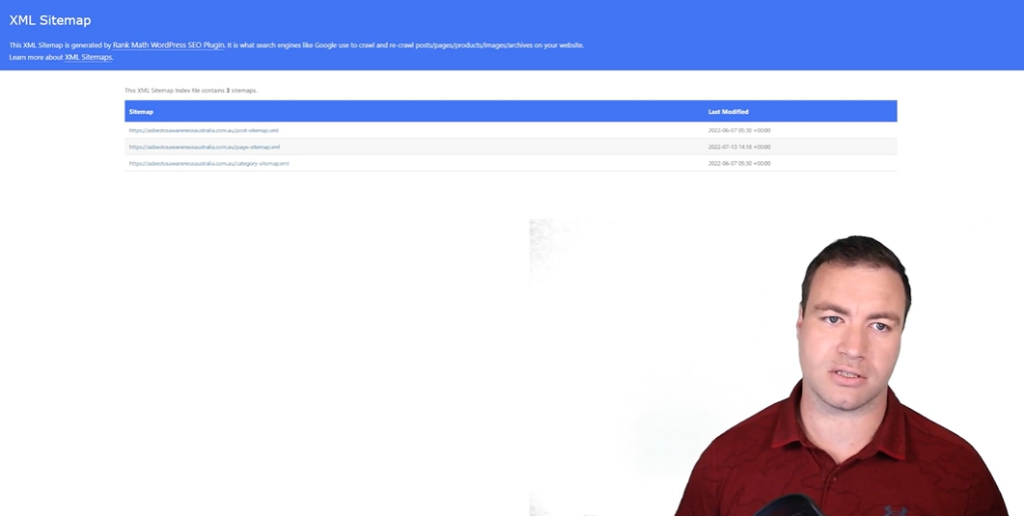
If you’re using platforms like WordPress, creating a sitemap can be straightforward. You can typically access it by typing sitemap.xml directly into your browser. That’s your first step! If that doesn’t work, look for sitemap_index.xml. It’s like trying different keys until one opens the door!
“A well-structured sitemap is the foundation of a successful SEO strategy.”
In my experience, taking time to set up a sitemap pays off. You’re not just creating an ordinary page; you’re building a pathway for Google. And, who wouldn’t want to take the scenic route when exploring their site’s potential?
How To Locate Your Sitemap

Locating your sitemap can feel a bit daunting at first, but I promise it’s simpler than you might think. It's essential for keeping your website discoverable. Let me walk you through the steps.
1. Identify Your Website Platform
First things first - what platform is your website built on? Knowing this will guide you in finding your sitemap. Common platforms include:
- WordPress
- Duda
- Squarespace
- Wix
Each platform may have different processes for sitemap creation, so it’s worth taking a moment to identify yours. For example, if you’re using WordPress, you’ll have a couple of straightforward options.
2. Check Common Sitemap URL Formats
Next, let’s move into the URL formats. A typical sitemap can usually be found at:
sitemap.xmlsitemap_index.xml
What’s more, some platforms will automatically generate these files for you. So, just by typing one of these URLs into your browser, you might just strike gold! If you don't see anything with sitemap.xml, try sitemap_index.xml instead. Don’t be surprised if you're redirected here if you have certain plugins installed (like Rank Math, for instance).
3. The Role Of Plugins
Speaking of plugins, let’s talk about their importance in sitemap generation. For platforms like WordPress, having the right plugins can simplify the process immensely. They can automatically update your sitemap whenever you create or delete pages. This means less hassle for you.
Have you ever thought about how much easier website management would be if everything could be automated? With plugins, that’s pretty much what happens: installation leads to automatic sitemap generation!
So take advantage of these tools to ensure your website is as streamlined as possible. It’s like having a personal assistant who takes care of the technical mess.
By following these steps and checking each point, you can locate your sitemap with ease. Remember, finding it is just the first step toward making your website more visible to search engines. Happy hunting!
Uploading Your Sitemap To Google Search Console

Let’s get into the nitty-gritty of uploading your sitemap to Google Search Console. Why bother with a sitemap? Simply put, it’s like giving Google a map to your content. If you're ready, let’s explore more on how to add a sitemap to Google Search Console.
1. Logging Into Google Search Console
First off, if you haven't logged in yet, head over to www.google.com/webmasters/tools/ and sign in with your Google account. Got it? Great! If you don't have an account, create one. It’ll only take a minute.
Once you’re in, you might see a dashboard showing your site's performance. If you have multiple properties listed, make sure you choose the right one - the one you want to submit the sitemap for.
2. Locating The 'Sitemaps' Section
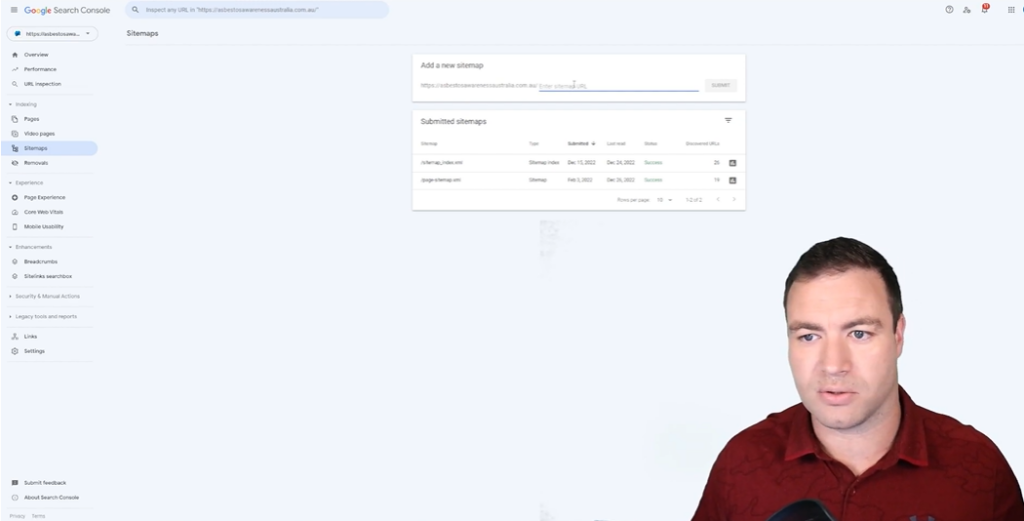
This part is straightforward. In the left sidebar of Google Search Console, look for the “Sitemaps” option. It should be right under “Index.” Click on it.
- You’ll see a simple interface where you can see submitted sitemaps.
- In the text box that appears, type in the URL for your sitemap. Agonizing over what that is? If you're using WordPress, you can often find it at
www.yourwebsite.com/sitemap.xmlorwww.yourwebsite.com/sitemap_index.xml.
3. Submitting Your Sitemap
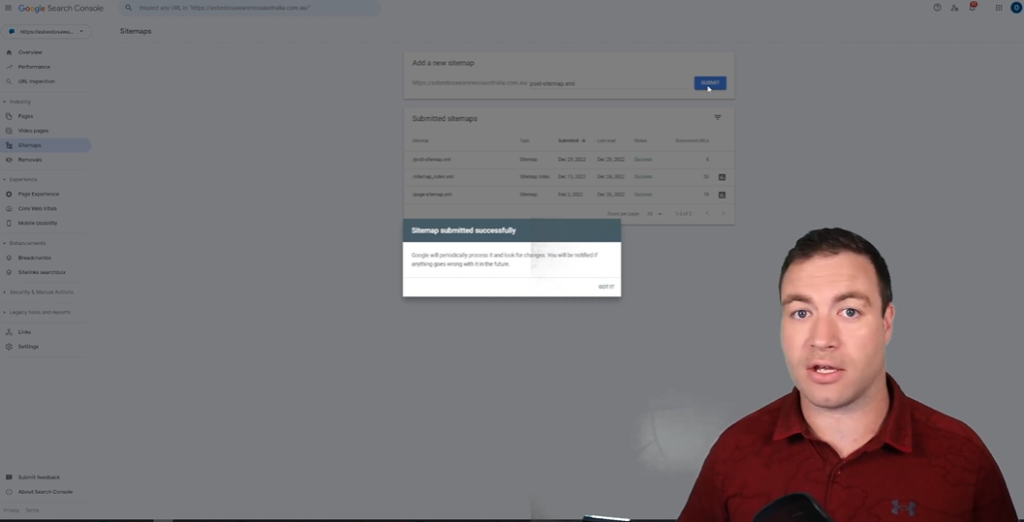
Now, just hit the “Submit” button. That’s it! Your next step is waiting. It usually doesn’t take long for Google's crawlers to start indexing your site.
4. Troubleshooting Common Errors
Sometimes things don’t go as planned. Here are a few common issues:
- Invalid Sitemap URL: Make sure you typed the URL correctly. Even a small typo can cause trouble.
- HTTP Errors: If you see responses like 404 or 500 errors, check if your site is down and that your sitemap URL is actually live.
Don’t worry too much! This is just a learning curve, right? If you're still stuck, seeking help in forums or Google’s own help resources can shed some light.
So there you are! Navigating the process of uploading a sitemap doesn’t have to be overwhelming. Just think of it as providing Google with a guided tour of your website. Happy submitting!
A Helpful Tip: Sub-Sitemaps For Blog Content

When it comes to blogging, visibility is key. But, how do we ensure that our blog posts are easily discovered? One of the best strategies I've found is creating a specific sitemap for blog posts. It may sound technical, but it’s really quite straightforward.
Why Use A Sitemap
A sitemap functions like a roadmap for Google, helping it navigate your website. Without it, your blog posts might remain hidden, making it difficult for your target audience to find them. I often say, “If you build it but no one knows, did it even exist?”
Creating A Specific Sitemap
- Identify your blog posts
- Group them based on categories or themes
- Create individual URLs for each group
By organizing your content in this manner, you not only enhance visibility but also improve your site’s overall SEO. Think of it as setting up little signposts leading readers to your content.
The Power Of Sub-Sitemaps
Now, let’s talk about sub-sitemaps. What’s the advantage? By having separate sitemaps for different content sections, you give search engines a clearer picture of what to expect. This segmentation allows for more efficient indexing.
Imagine if you had to read a massive book without chapters. Confusing, right? Sub-sitemaps make it easier for both Google and your audience to digest the “chapters” of your blog.
A Real-Life Example
Let me share how I put this into practice for a charity’s blog - Asbestos Awareness Australia. After analyzing their website structure, I noticed an opportunity for improvement. I created a sitemap specific for their blog posts, using a dedicated sitemap.xml file, which included links for each post.
Once that was sorted, I submitted the sitemap to Google Search Console. This simple act ensured that every single blog post was acknowledged and indexed. In the long run, it boosted their visibility and allowed more people to discover their vital content.
I encourage you to consider implementing sub-sitemaps for your own blog. You’ll be surprised at how much of a difference it makes!
Conclusion: Your Path To Greater Online Visibility
As we wrap up our journey into enhancing your website’s visibility, let’s revisit the critical steps on how to add a sitemap to Google Search Console. Why, you ask? Well, a sitemap is like a treasure map for Google, guiding the search engine through the labyrinth of your content. It helps ensure that all your site's pages are indexed effectively, improving your chances of showing up in search results.
Steps Recap
First, we discovered how to find your sitemap. For many, it’s as simple as typing "sitemap.xml" or "sitemap_index.xml" into your browser. Then, armed with that URL, we moved on to Google Search Console. Here, I demonstrated how to add the sitemap by navigating to the "Sitemaps" section and pasting in the link. Simple, right? This process lets Google know where to find the essential pages of your site.
Keeping Tabs
But it doesn’t stop there. It’s vital to monitor Google Search Console for any updates or errors related to your sitemap. This might seem tedious, but maintaining this oversight can save you from potential pitfalls down the line. Imagine submitting a sitemap and finding out later that it had errors. Ouch! Regular checks can help you stay one step ahead.
A Personal Reflection
Reflecting on my journey, adding a sitemap transformed my approach to SEO. It felt like unlocking a different level in a game, where suddenly, my website became more visible and engaging for users. I realized how influential a well-structured site can be. Remember, every small step matters in the quest for better online visibility. Your effort in ensuring your content is indexed properly will yield fruit in the form of increased traffic.
So, let’s not underestimate the power of that little sitemap. It’s a gateway to greater visibility. I encourage you to take these steps and start monitoring your site's performance. I’m excited to see where your efforts lead! Now, go out there and make your presence known!


